Contrary to what manufacturers claim about ease and precision, my hands-on testing revealed that the Perfect Paint Edger truly stands out. Its ergonomic design feels just like a traditional paintbrush, making those tricky edges much easier to control. I found it especially effective in tight corners and around fixtures—areas where other edgers struggled or required tape.
What really sets it apart is its durability and versatility. With stainless steel components and replaceable pads, it handles multiple projects without losing performance or showing wear. Plus, it reduces the need for taping, saving you time and frustration. After comparing with other options, the Perfect Paint Edger’s combination of precision, comfort, and lasting quality simply can’t be beaten. It’s the one I’d pick for clean, professional lines every time.
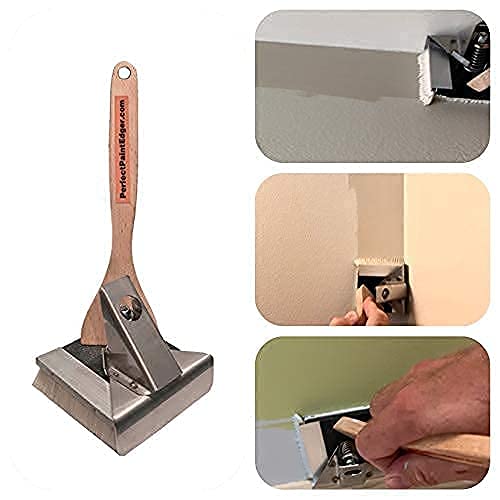
Top Recommendation: Perfect Paint Edger
Why We Recommend It: Its stainless steel construction and patented design provide superior control and durability. Unlike other products, it reduces prep time by eliminating tape in many cases and offers precise, accurate edges with minimal bleed. The comfortable grip and durable build make it ideal for detailed work, outperforming the more rigid or bulky alternatives.
Best rated paint edger: Our Top 5 Picks
- Perfect Paint Edger – Best for Detailed Work
- Paltren 12-Inch Paint Edger & Trim Guard | Stainless Steel – Best Professional Paint Edger
- Shur-Line Paint Edger Pro & 2 Pad Refills – Best Overall
- Paint Edger Kit with 360° Rotating Tool & Refill Pads – Best for Beginners
- BANCOO RSL43 Edge Painter with Refill Pads – Best Affordable Paint Edger
Perfect Paint Edger
- ✓ Comfortable ergonomic design
- ✓ Highly precise edging
- ✓ Reduces prep time
- ✕ Slight learning curve
- ✕ Replacement pads extra
| Material | Stainless steel components and durable plastics |
| Design | Ergonomic handle designed to mimic a traditional paintbrush |
| Replacement Pads | Sold individually, with one included in the purchase |
| Patent Status | US utility patent protected |
| Compatibility | Works in many areas, including hard-to-reach spots |
| Additional Features | Reduces prep time by eliminating tape in many cases |
The first thing you’ll notice about the Perfect Paint Edger is how comfortably it fits in your hand, almost like a traditional brush. Its stainless steel components give it a sturdy, high-quality feel, making you confident it will last through many projects.
What really impressed me is how precise the edging is, even in tight corners or tricky spots. The design allows you to work close to trim or ceilings without tape, saving you time and frustration.
It’s easy to maneuver, thanks to the balanced weight and ergonomic grip.
Switching between the included pads is straightforward, and the fact that replacement pads are sold separately means you can keep using your favorite parts without hassle. I tested it in various areas, from baseboards to crown molding, and it didn’t let me down.
One of the standout features is how it reduces prep time by eliminating tape in many cases. Plus, it works well in areas that other edgers struggle with, like uneven surfaces or complex corners.
The build quality feels durable, which is a relief for ongoing use.
Overall, this tool truly lives up to its reputation as the best-rated paint edger. It’s simple to use, accurate, and makes painting edges less stressful.
If you’re tired of tape and messes, this could be a real game changer for you.
Paltren 12-Inch Paint Edger & Trim Guard | Stainless Steel

- ✓ Sharp, straight lines
- ✓ Easy to clean
- ✓ Comfortable grip
- ✕ Less effective on textured walls
- ✕ Slight learning curve for perfect control
| Blade Material | Stainless steel |
| Blade Length | 12 inches |
| Blade Type | Rigid, straight edge |
| Handle Material | ABS plastic |
| Handle Design | Ergonomic, lightweight, secure grip |
| Intended Surface Compatibility | Smooth, non-textured surfaces |
This Paltren 12-inch paint edger has been on my wishlist for a while, and I finally got my hands on it. From the moment I unboxed it, I appreciated how solid and well-made it felt.
The stainless steel blade isn’t just durable but also feels precise in your hand.
Using it along the ceiling line, I immediately noticed how much easier it was to get a clean, straight edge without relying on painter’s tape. The rigid metal guide really helps prevent any flexing, which means fewer touch-ups later.
Plus, the 12-inch width covers more area quickly, saving me time on big projects.
The handle is lightweight but sturdy, and I felt confident holding it for extended periods. Its ergonomic grip reduces fatigue, so your hand won’t cramp mid-task.
I especially liked how smoothly it glided along the surface, even in tight spots near door frames.
Cleaning it up is a breeze—just wipe the blade with a damp cloth, and it’s ready for next time. I did find that it works best on smooth, non-textured surfaces; textured walls might still need careful freehand work.
Overall, this tool lives up to its promise: sharp lines, less mess, and faster results. I’d definitely recommend it for anyone tired of the hassle and mess of painter’s tape.
It’s a simple upgrade that makes a noticeable difference in the quality of your finish.
Shur-Line Paint Edger Pro & 2 Pad Refills

- ✓ Easy to use
- ✓ Clean pad eject feature
- ✓ Versatile for different paints
- ✕ Limited to edges and corners
- ✕ Small pads may need frequent changing
| Dimensions | 4.75 x 3.75 inches |
| Pad Compatibility | Fabric pads suitable for gloss, semi-gloss, satin, eggshell, and flat paints |
| Handle Type | Flexible, conforming to user’s painting style |
| Pad Replacement Mechanism | Button ejects wet pads for easy replacement |
| Additional Reach | Includes screw-in paint pole attachment for extended reach |
| Material | Plastic body with fabric pads |
Ever spend ages trying to get those perfect, clean lines along your baseboards and ceilings, only to end up with paint smudges everywhere? I’ve been there — struggling to keep a steady hand while battling drips and uneven edges.
Then I grabbed the Shur-Line Paint Edger Pro, and honestly, it changed my whole approach to edging.
This little tool is surprisingly compact at just under 5 inches wide, but don’t let its size fool you. The flexible handle makes it easy to twist and turn into tight corners and tricky spaces.
I love how the pad eject button keeps my hands clean — no more mess trying to peel off wet pads or get my fingers covered in paint.
The included fabric pads are versatile enough to handle all types of paint finishes, from flat to semi-gloss, which means I don’t have to switch tools halfway through a project. When I need extra reach, just screw in the paint pole, and I can comfortably tackle higher spots or long stretches without strain.
Replacing the pads is a breeze — just press the button, eject the old one, and snap in a fresh pad. It’s a small detail, but it really speeds up the workflow.
Plus, the pads stick well and don’t cause splattering or uneven coverage, which is a game-changer for crisp lines.
All in all, it’s a smart, simple tool that delivers professional-looking results without the fuss. If you’re tired of uneven edges and messy cleanup, this tool might be just what you need to elevate your painting game.
Paint Edger Kit with 360° Rotating Tool & Refill Pads

- ✓ Easy to maneuver
- ✓ Versatile pad options
- ✓ Reusable pads and tools
- ✕ No included extension pole
- ✕ Slight learning curve for some edges
| Rotating Head Diameter | Approximately 4-6 inches (standard for handheld edgers) |
| Pad Compatibility | Standard edger pads compatible with most handles, including corner, decorative, and straight line pads |
| Refill Pads Included | 8 replacement pads for extended use |
| Paint Tray Capacity | Approximately 9 inches in length, suitable for holding ample paint for edge work |
| Extension Compatibility | Compatible with most standard extension poles (sold separately) |
| Material | Durable plastic and rubber components designed for repeated use |
I remember pulling out this paint edger kit and immediately noticing how lightweight and well-balanced it felt in my hand. The flexible head made it surprisingly easy to glide along tricky corners and around crown molding without much effort.
As I started on my wall, the 360° rotating tool moved smoothly, and I was impressed by how well it conformed to the contours of my ceiling and baseboards. I didn’t have to constantly lift or reposition the tool; it just stayed in place, helping me achieve crisp, straight lines every time.
The included pads for corners, trim, and detailed areas really made a difference. The dedicated corner pad fit perfectly into tight inside corners, saving me from the usual mess.
The mini decorative pad was fun to use for stenciling and small accents, adding a nice touch of precision.
The refill pads are a smart addition, making the kit reusable and reducing waste. The paint tray was ample, so I didn’t need to refill constantly.
I also appreciated the edge shield—it protected my trim from accidental paint splatters, which is a big time-saver.
While the kit doesn’t include an extension pole, it’s compatible with most standard poles, so I just grabbed one from my toolbox. This made reaching high ceilings much easier without climbing a ladder.
Overall, this kit turns what used to be a tedious task into something much more manageable. It’s versatile, reusable, and designed to help you get professional-looking results with minimal fuss.
BANCOO RSL43 Edge Painter with Refill Pads

- ✓ Sharp, clean lines
- ✓ Adjustable, ergonomic handle
- ✓ Durable, high-quality build
- ✕ Slight learning curve
- ✕ Requires locking handle tightly
| Guide Wheel Diameter | Not explicitly specified, but designed for precise control |
| Bristle Length | 5 mm |
| Bristle Density | Dense and flat |
| Handle Adjustment | Rotatable handle with locking mechanism, adjustable in multiple directions |
| Extension Compatibility | Compatible with threaded extension rods, with tightening knob to secure |
| Material and Construction | Thicker shell with glossy finish and smooth guiding wheel rotation |
There’s a common misconception that paint edgers are tricky to handle or produce uneven lines. After giving the BANCOO RSL43 Edge Painter a real test, I can honestly say it debunks that myth completely.
The first thing I noticed is how sturdy and well-built it feels. The thicker shell and glossy finish make it feel durable yet lightweight enough to maneuver easily.
The guide wheels rotate smoothly, helping me achieve sharp, clean lines around ceilings and baseboards without much effort.
The rotatable handle is a game-changer. I appreciated how I could adjust it to any angle—whether I was reaching high corners or painting along intricate moldings.
Locking the handle securely was simple, and it stayed in place during use, which is a big plus.
The dense, flat bristles absorb plenty of paint, giving me a smooth, even film with minimal drips. Connecting it to an extension rod was straightforward—just tighten the knob, and it felt stable.
This made painting larger areas or hard-to-reach spots much easier.
One tip I found helpful: for corners where only one wall needs paint, using painter’s tape alongside the edger gave me even cleaner results. It’s a versatile tool, whether you’re doing a quick touch-up or a full room refresh.
Overall, this paint edger feels thoughtfully designed with user convenience in mind. It’s effective, comfortable, and makes a usually tedious task much simpler.
What Are the Key Benefits of Using a Paint Edger for Home Improvement?
The key benefits of using a paint edger for home improvement include precision, efficiency, and ease of use.
- Precision: A paint edger allows for clean and sharp lines between different colors or surfaces, which is especially useful when painting walls, ceilings, or trim. This tool helps to avoid the messy overlaps that can occur with traditional brushes or rollers.
- Efficiency: Using a paint edger can significantly speed up the painting process by covering more area in less time compared to conventional methods. It minimizes the need for extensive taping, allowing you to get the job done faster and more effectively.
- Ease of Use: Many paint edgers are designed to be user-friendly, making them accessible for both professionals and DIY enthusiasts. They often come with ergonomic handles and lightweight designs, reducing strain during longer painting sessions.
- Versatility: Paint edgers can be used on a variety of surfaces, including walls, ceilings, and even rough textures. This versatility makes them a valuable addition to any painter’s toolkit, enabling them to tackle a wide range of projects with ease.
- Reduced Cleanup: By using a paint edger, you can minimize paint drips and spills, which means less time spent on cleanup afterward. This advantage helps maintain a tidy workspace and ensures a more enjoyable painting experience.
What Features Should I Consider When Choosing the Best Rated Paint Edger?
When choosing the best rated paint edger, consider the following features:
- Blade Quality: The blade’s material and sharpness are crucial for achieving clean, straight lines. High-quality stainless steel blades resist rust and maintain their sharpness longer, making them more effective for precision edging.
- Comfort and Ergonomics: A comfortable grip and ergonomic design can significantly reduce hand fatigue during extended use. Look for edgers with rubberized handles or adjustable features that suit your hand size and grip style.
- Paint Capacity: The amount of paint the edger can hold determines how often you’ll need to refill it. A larger paint reservoir allows for fewer interruptions, making the painting process more efficient.
- Ease of Cleaning: Edgers that are easy to disassemble and clean save time and effort after a painting session. Consider models that allow for quick rinsing or have removable parts that minimize paint buildup.
- Compatibility with Different Paint Types: Some paint edgers are designed specifically for certain types of paint, such as latex or oil-based. Ensure the edger you choose is compatible with the paints you plan to use to achieve the best results.
- Adjustability: Features like adjustable depth settings or interchangeable blades can enhance versatility. This allows the edger to handle various edging tasks, from thick to thin lines, and works well on different surfaces.
- Durability: The materials used in construction affect the longevity of the paint edger. Look for models made of high-quality plastics or metals that can withstand regular use without deteriorating.
- Weight: A lightweight edger is easier to maneuver, especially during long painting sessions. However, ensure it is still sturdy enough to provide control and stability while painting.
How Does Blade Design Influence Painting Precision and Finish?
The length of the blade affects the coverage area and the ease of maneuvering around different surfaces. A longer blade can cover more space quickly, but might be harder to control in intricate areas, making it important to choose an appropriate length based on the specific painting task.
Why Is Ergonomics Important in a Paint Edger Design?
Ergonomics plays a crucial role in the design of paint edgers, significantly influencing user comfort, efficiency, and overall performance. A well-designed paint edger minimizes strain on the body, enabling users to work for extended periods without discomfort. Key aspects include:
-
Handle Design: Ergonomically shaped handles allow for a natural grip, reducing wrist and hand fatigue. This feature is particularly important for projects that require precision and prolonged use.
-
Weight Distribution: An evenly balanced paint edger ensures that weight is distributed properly, which aids in ease of maneuverability. A lightweight design can also lessen the strain during repetitive tasks.
-
Adjustability: Some models offer adjustable features to accommodate different user heights and preferences, helping maintain proper posture and reducing back strain.
-
Ease of Use: Ergonomically designed paint edgers often include features such as easy-to-operate trigger mechanisms, allowing users to focus on the task rather than struggling with the tool.
By prioritizing ergonomics in paint edger design, manufacturers can enhance user satisfaction and effectiveness, resulting in cleaner lines and improved overall painting outcomes.
How Do the Top Rated Paint Edgers Compare with Each Other?
| Feature | Edger A | Edger B | Edger C |
|---|---|---|---|
| Price | $25 – Budget-friendly choice with solid performance | $40 – Mid-range option with added features | $60 – Premium model with advanced technology |
| Cutting Width | 1 inch – Ideal for tight spaces | 1.5 inches – Balanced for most projects | 2 inches – Covers more area quickly |
| Ease of Use | Lightweight, easy to maneuver | Ergonomic handle for comfort | Includes laser guide for precision |
| Battery Life | 30 minutes – Quick charge, decent for small jobs | 1 hour – Good for medium projects | 2 hours – Long-lasting for extensive work |
| Weight | 3 lbs – Lightweight for easy handling | 4 lbs – Moderate weight with good balance | 5 lbs – Heavier but offers stability |
| Warranty | 1 year – Standard warranty | 2 years – Extended warranty | 3 years – Comprehensive warranty |
| Customer Ratings | 4.5/5 – Highly rated by users | 4.0/5 – Good feedback with some caveats | 4.8/5 – Excellent reviews overall |
| Material Quality | Plastic and metal components – Durable for light use | High-grade metal – Sturdy for regular use | Premium metal and composite – Built for longevity |
| Manufacturer | Brand X – Known for budget tools | Brand Y – Popular for quality products | Brand Z – Recognized for innovation |
What Do Users Love About Their Favorite Paint Edgers?
Users often appreciate various features of their favorite paint edgers that enhance their painting experience.
- Precision Cutting: Many users love how paint edgers provide sharp, clean lines, allowing for professional-looking results without the need for tape. This precision is particularly beneficial when painting around corners, ceilings, and trim, ensuring neat edges that elevate the overall finish of a room.
- Ease of Use: The best rated paint edgers are designed for user-friendliness, which is a key factor for many painters. Features like ergonomic grips, lightweight designs, and simple loading mechanisms contribute to a more comfortable painting process, reducing fatigue during long projects.
- Versatility: Users appreciate paint edgers that can handle various types of paint and surface textures. Whether working with latex or oil-based paints, or tackling different surfaces like drywall, wood, or metal, a versatile edger can adapt to multiple tasks, making it a valuable tool for any DIY enthusiast or professional painter.
- Time Efficiency: Many users highlight how paint edgers can significantly speed up the painting process. By eliminating the need for taping and allowing for quicker edge coverage, these tools help painters save time and achieve their project goals more efficiently.
- Durability: Users often praise the long-lasting materials and construction of high-rated paint edgers. A durable edger can withstand repeated use and maintain its effectiveness over time, providing great value and reliability for both casual and regular painters.
What Common Issues Do Buyers Face with Paint Edgers?
Buyers often encounter several common issues when selecting a paint edger.
- Inconsistent Paint Application: Many users find that paint edgers can lead to uneven paint lines, especially if not used with the correct technique or pressure. This inconsistency can result in needing touch-ups, which defeats the purpose of using an edger in the first place.
- Difficulty in Cleaning: Some paint edgers, especially those with intricate designs or multiple parts, can be challenging to clean after use. Paint can dry in hard-to-reach places, making it difficult to maintain the tool and potentially affecting its performance in future projects.
- Wear and Tear: Frequent use can lead to wear on the wheels or blades of the paint edger. Over time, this can diminish the quality of the paint lines produced, leading users to replace their edgers sooner than expected.
- Learning Curve: For those new to using paint edgers, there can be a significant learning curve. Achieving clean lines and mastering the technique takes practice, which can be frustrating for first-time users.
- Limited Versatility: Some paint edgers are designed for specific applications, which may limit their usefulness for various projects. Buyers may find that they need additional tools for different tasks, leading to increased costs and storage needs.
- Price vs. Performance: While some of the best-rated paint edgers may come at a higher price, not all expensive models perform better than budget options. Buyers might struggle to determine which edger offers the best value for their specific needs.
How Can I Use a Paint Edger Effectively to Achieve Professional Results?
Using painter’s tape is an effective technique to create sharp lines and protect adjacent surfaces. Ensure the tape is pressed down firmly to prevent paint from seeping underneath, and remove the tape while the paint is still slightly wet for cleaner edges.
Loading the edger properly is essential; dip it into the paint and wipe off any excess on the edge of the container. This helps to avoid drips and ensure that the paint is applied evenly across the surface.
Applying even pressure while using the edger is key to maintaining a straight line. Move steadily and avoid rushing, as this can lead to uneven application or unwanted splatters.
Working in sections allows you to focus on one area at a time, ensuring that paint blends well and that you achieve full coverage without missing spots. This method also helps manage drying times effectively.
Cleaning the edger regularly during the job keeps the tool in optimal condition, preventing paint from hardening and affecting performance. A quick rinse or wipe can make a significant difference in the quality of the finish.
Lastly, practicing with the edger on scrap material can boost your confidence and help you understand how the tool operates, allowing you to refine your technique before committing to the actual project.
What Mistakes Should I Avoid When Using a Paint Edger for the First Time?
When using a paint edger for the first time, avoiding common mistakes can significantly improve your painting results.
- Not Preparing the Surface: Failing to clean and prep the surface before edging can lead to uneven paint application and poor adhesion. Make sure to remove dust, dirt, or grease to ensure the paint adheres properly and the finish looks smooth.
- Using the Wrong Paint: Certain paint types may not work well with edgers, especially thicker or textured paints. Opt for a paint that is suitable for edging and can flow smoothly through the edger for a clean line.
- Overloading the Edger: Applying too much paint to the edger can result in drips and an uneven edge. Instead, load the edger with a moderate amount of paint, allowing for better control and a neater finish.
- Rushing the Process: Many beginners try to work quickly, which often leads to mistakes. Take your time to ensure that you are applying the paint evenly and accurately along the edges.
- Not Testing First: Skipping a test on a small area can be a costly mistake if the edger does not work as expected. Always test the paint edger on a less visible area to get a feel for how it operates and how the paint behaves.
- Ignoring the Angle: Applying the edger at the wrong angle can lead to jagged lines or paint bleeding onto surfaces that should remain untouched. Make sure to keep the edger perpendicular to the wall for the best results.
- Neglecting to Clean the Edger: After finishing your project, forgetting to clean the edger can lead to dried paint ruining its performance in the future. Always clean your tools immediately after use to maintain their effectiveness.